
Kubernetes被称为下一代操作系统,了解它,对于一个技术同学来说,是很有必要的。本文追踪一下kubernetes (以下简称为k8s)下应用的定义、部署过程,希望能暴露一些学习上的一些遗漏和问题。
定义应用
kubernetes是一个容器编排工具,应用开发后封装为一个容器镜像,要想通过k8s部署,第一步是定义应用。这里的定义指, 告诉k8s
- 使用哪个镜像
- 部署多少副本
- 应用配置
- 如何露出服务
仅从学习角度考虑,可以使用一个简单的yaml文件完成应用定义。如一个3副本的nginx应用,可以通过内容如下的deployment.yaml文件进行定义。
apiVersion: apps/v1
kind: Deployment
metadata:
  name: nginx-deployment
  labels:
    app: nginx
spec:
  replicas: 3
  selector:
    matchLabels:
      app: nginx
  template:
    metadata:
      labels:
        app: nginx
    spec:
      containers:
      - name: nginx
        image: nginx:1.14.2
        ports:
        - containerPort: 80
在生产场景中,往往需要部署多个应用,应用间有负载的依赖关系,这时可以结合helm, argo等开源工具进行应用的定义、编排。
应用部署
在deployment.yaml中定义应用后,如何部署、启动应用呢?一行 kubectl create -f deployment.yaml 就可以了。我们现在看下这行命令做了什么。
首先简单介绍下k8s的架构。在k8s集群中节点分两类,一类是master一类是node。master的角色主要是管控,包括的组件有
- APIServer: 对外露出k8s的管控接口
- Scheduler: 将pod调度到合适的工作节点
- ControllerManager:管控集群中的各类资源
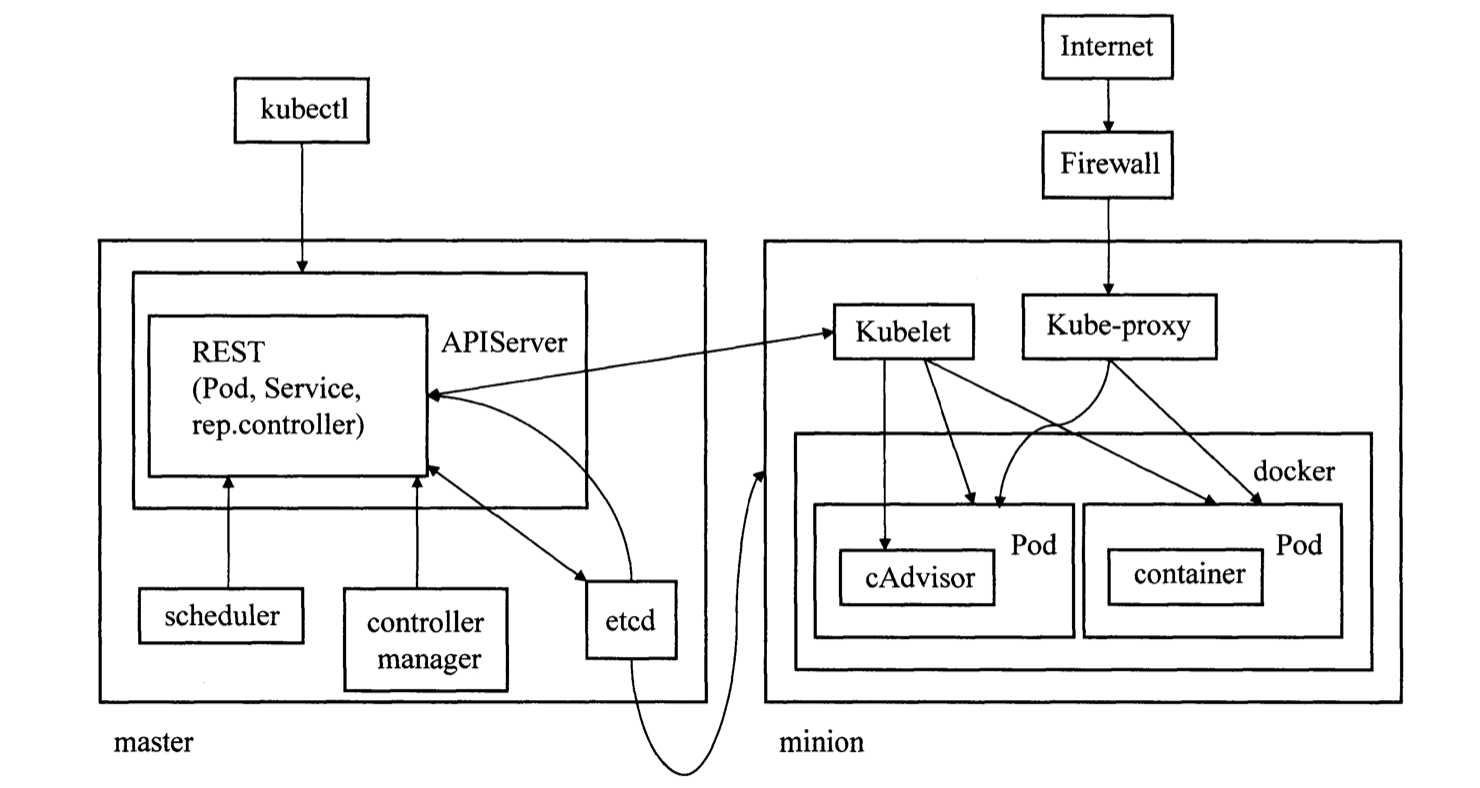
kubectl本质是封装了对APIServer的调用,kubectl create -f deployment.yaml是就是一次rest api接口调用。在k8s的设计中,管控接口的请求统一打到APIServer,并由APIServer更新etcd。其他组件也通过APIServer监听etcd中资源的变化并做相应处理,从而实现组件间解耦。
	err = c.client.Post().
		Namespace(c.ns).
		Resource("deployments").
		VersionedParams(&opts, scheme.ParameterCodec).
		Body(deployment).
		Do(ctx).
		Into(result)
当APIServer收到创建deployment的请求,经过认证、鉴权后,最终会在etcd持久化一个deployment对象。可以通过etcdctl直接查看
ETCDCTL_API=3 etcdctl --cacert=/etc/kubernetes/pki/etcd/ca.pem \
--cert=/etc/kubernetes/pki/etcd/etcd-client.pem \
--key=/etc/kubernetes/pki/etcd/etcd-client-key.pem \
get /registry/deployments/default/nginx-deployment -w=json | jq .
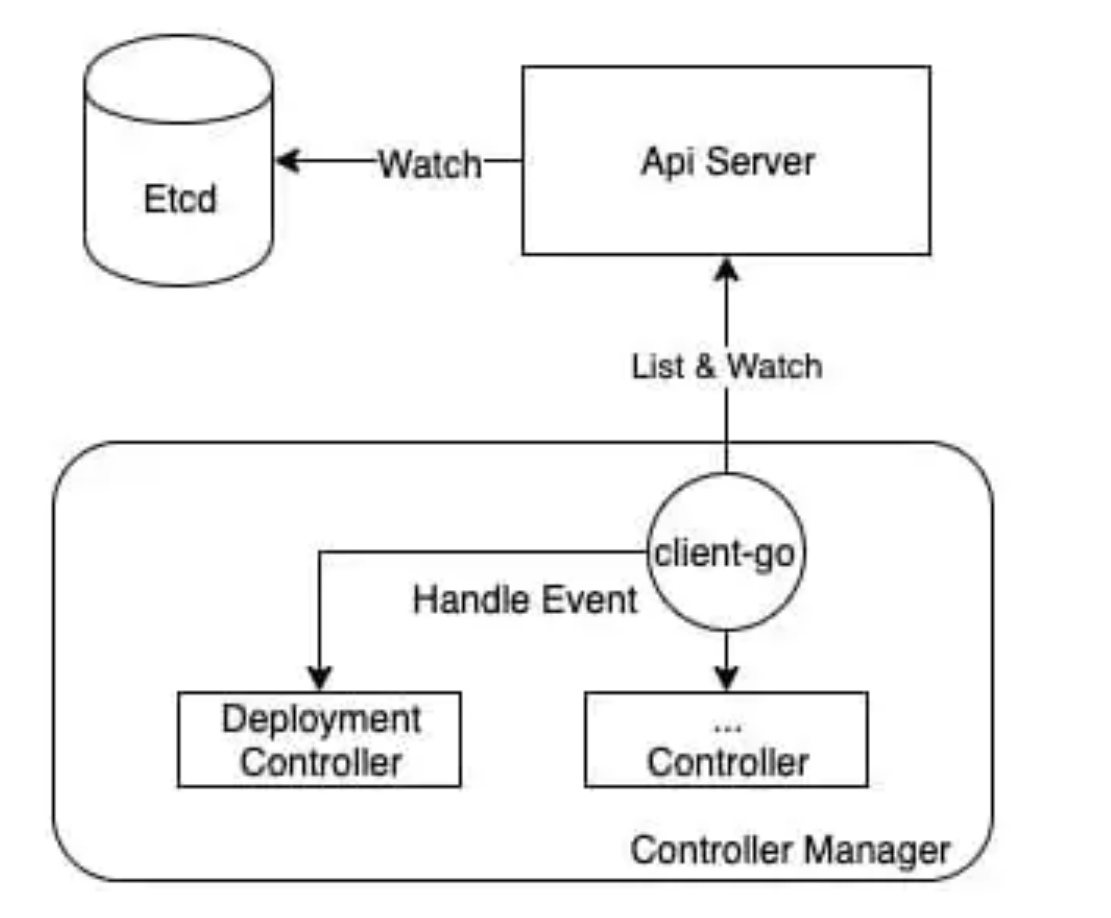
controller-manger中包括多个controller,通过list-watch机制不断监听着etcd中各类资源的变化,以作出相应处理,其中就包括deployment-controller。controller-manger通过reflector不断从etcd获取资源事件事件,并写到delta-fifo中。每个资源有一个单例的informer,该informer从delta-fifo中读取它关心的事件,并
- 交由注册的hander (可能多个)处理
- 存到indexer中 (类似缓存, controller查询资源时优先查indexer,以降低对APIServer的压力)
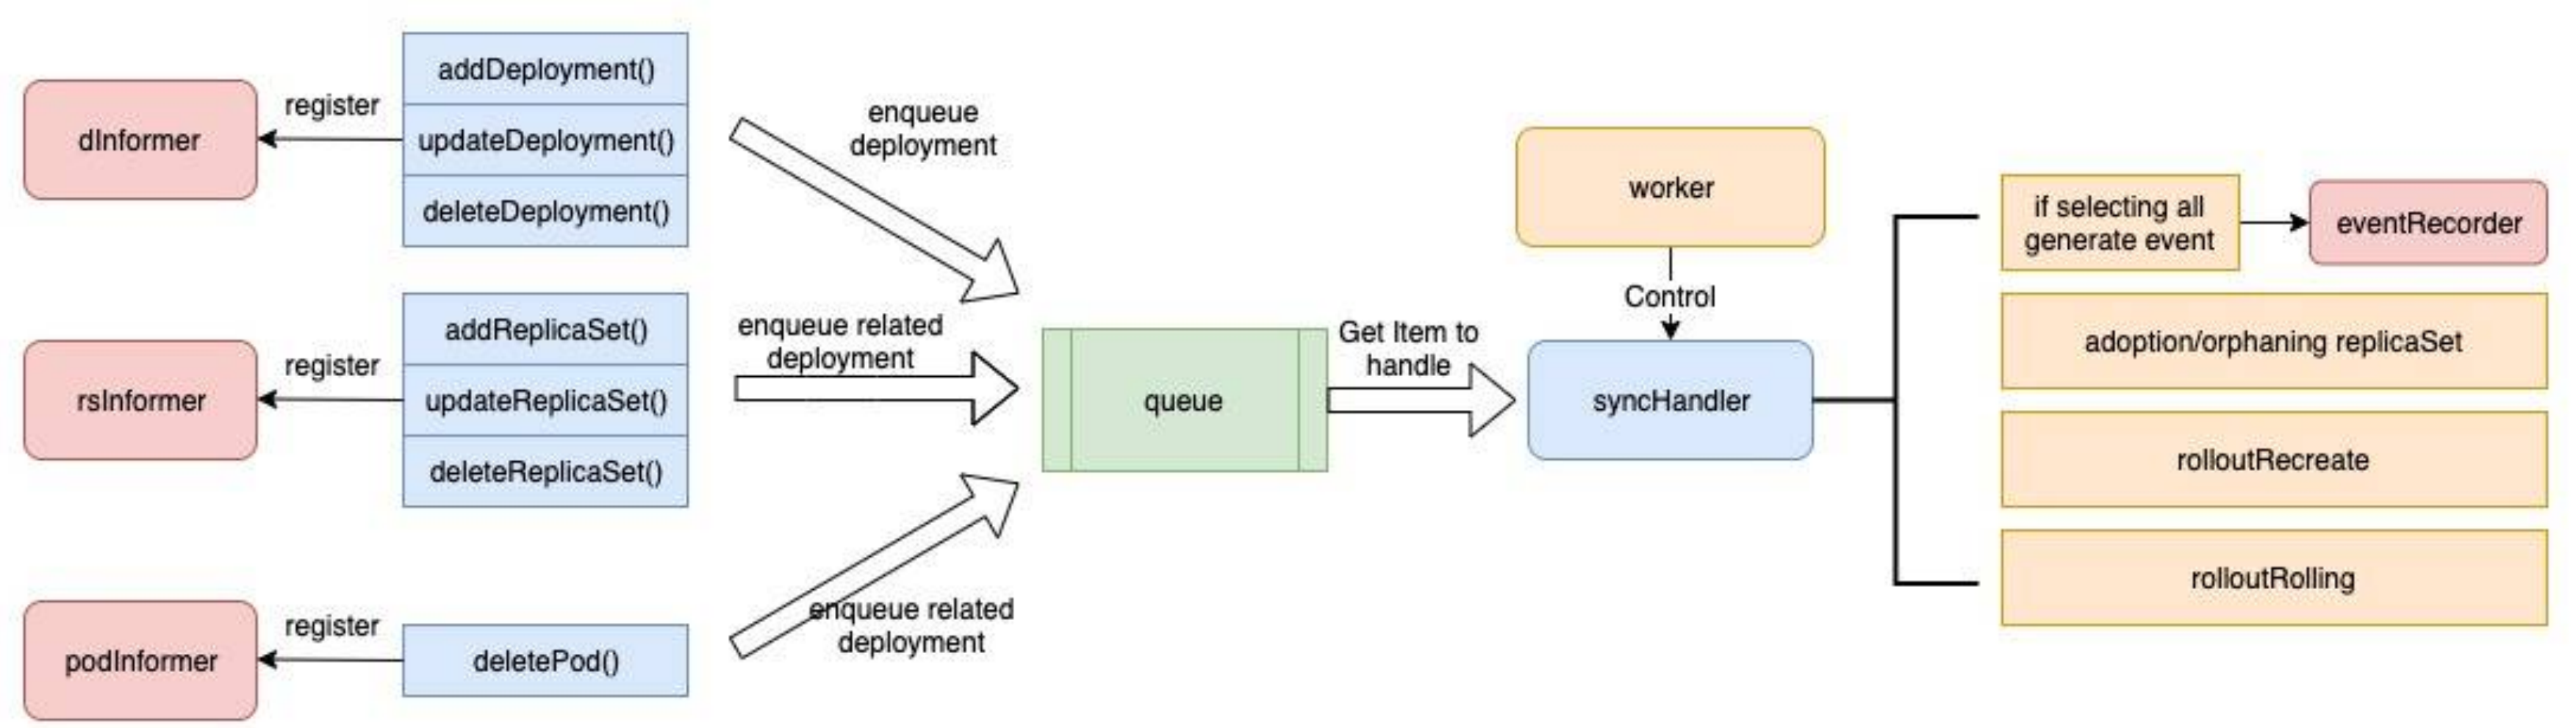
deployment-controller

deployment-controller向3个informder注册了hander,dInformer, rsInformer, podInformer也即deployment-controller会感知deployment、replicaset、pod三个资源的变化,并作出反应,这是符合预期的。
// NewDeploymentController creates a new DeploymentController.
func NewDeploymentController(dInformer appsinformers.DeploymentInformer, rsInformer appsinformers.ReplicaSetInformer, podInformer coreinformers.PodInformer, client clientset.Interface) (*DeploymentController, error) {

	// some codes are neglected for simpilicity

	dc := &DeploymentController{
		client:        client,
		eventRecorder: eventBroadcaster.NewRecorder(scheme.Scheme, v1.EventSource{Component: "deployment-controller"}),
		queue:         workqueue.NewNamedRateLimitingQueue(workqueue.DefaultControllerRateLimiter(), "deployment"),
	}

	dInformer.Informer().AddEventHandler(cache.ResourceEventHandlerFuncs{
		AddFunc:    dc.addDeployment,
		UpdateFunc: dc.updateDeployment,
		DeleteFunc: dc.deleteDeployment,
	})
	rsInformer.Informer().AddEventHandler(cache.ResourceEventHandlerFuncs{
		AddFunc:    dc.addReplicaSet,
		UpdateFunc: dc.updateReplicaSet,
		DeleteFunc: dc.deleteReplicaSet,
	})
	podInformer.Informer().AddEventHandler(cache.ResourceEventHandlerFuncs{
		DeleteFunc: dc.deletePod,
	})

	return dc, nil
}
回到主线,当我们执行kubectl create -f deployment.yaml,请求经过APIServer持久化到etcd,在由controller-manager监听到变化转悠deployment-controller进行处理,最终func (dc *DeploymentController) syncDeployment(key string)进行处理。对于一个新创建的deployment,最终在下面代码中创建replicaset, 接下来是replicaset-controller的主场。
func (dc *DeploymentController) getAllReplicaSetsAndSyncRevision(d *apps.Deployment, rsList []*apps.ReplicaSet, createIfNotExisted bool) (*apps.ReplicaSet, []*apps.ReplicaSet, error) {
	_, allOldRSs := deploymentutil.FindOldReplicaSets(d, rsList)

	// Get new replica set with the updated revision number
	newRS, err := dc.getNewReplicaSet(d, rsList, allOldRSs, createIfNotExisted)
	if err != nil {
		return nil, nil, err
	}

	return newRS, allOldRSs, nil
}
replicaset-controller
其实现代码在replica_set.go中,向2个informder注册了hander,分别是rsInformer, podInformer,hander包括
	rsInformer.Informer().AddEventHandler(cache.ResourceEventHandlerFuncs{
		AddFunc:    rsc.addRS,
		UpdateFunc: rsc.updateRS,
		DeleteFunc: rsc.deleteRS,
	})
	podInformer.Informer().AddEventHandler(cache.ResourceEventHandlerFuncs{
		AddFunc: rsc.addPod,
		UpdateFunc: rsc.updatePod,
		DeleteFunc: rsc.deletePod,
	})
replicaset-controller的逻辑流程和deployment-controller类似。对于收到rsInformer的通知、拿到新创建的replicaset后,首先将其放入队列,worker每秒钟运行一次、进行同步,最终使创建指定数量的pod。调用链路为addRs() -> enqueueRS() -> syncReplicaSet()->manageReplicas()->CreatePodsWithControllerRef(), 到此完成pod创建。
kube-scheduler
Kube-scheduler负责将pod分配到具体节点,实现代码主要在pkg/scheduler/scheduler.go。当从podInformer监听到pod的创建,如果该pod未分配到节点,kube-scheduler会将其加入SchedulingQueue。同时scheduleOne()不停运行,从该队列中取出pod,先通过各种filter,为pod选出满足硬性指标的节点;再通过优先级函数对满足条件的节点进行打分,最后选择打分最高的节点部署该pod。如果没有满足条件的节点,pod会一直在pending状态, scheduler会不断重试、直到有满足条件的节点。
预选策略支持的filter包括但不限于
- PodFitsHostPorts: 检查节点上pod所需的端口是否未绑定
- PodFitsHost: 检查pod是否通过域名限定了节点
- PodFitsResources: 检查节点上的cpu、memory资源是否满足需求
- PodMatchNodeSelector: 检查pod的node selector是否和节点的label匹配
- NoDiskConflict: 检查是否存在卷 冲突
- CheckNodeMemoryPressure: 检查节点内存是否紧张
- CheckNodePIDPressure: 检查节点进程资源是否紧张
- CheckNodeDiskPressure: 检查节点磁盘是否紧张
优先级函数包括但不限于
- LeastRequestedPriority:优先将pod分配到资源占用较小的节点上,根据cpu和memory两种资源的使用占比计算得分
- BalancedResourceAllocation:优先选择部署后cpu和内存占用均衡的节点,该策略不单独使用,必须配合其他策略,得分计算如下,由pod部署后节点cpu使用率和memory使用率差值的绝对值决定,该值越小,cpu和memory越均衡,得分越高
SelectorSpreadPriority:将属于同一个Service, StatefulSet,ReplicaSet的Pod尽量分配到不同的区域、主机。节点上已部署的、属于相同Service, StatefulSet,ReplicaSet的pod越少,节点打分越高
CalculateAntiAffinityPriority:优先将pod分配到具有指定标签的主机
最终,kube-scheduler创建了一个Bind对象用于记录了pod和node的绑定关系,并通过POST请求将其发往APIServer,由APIServer将pod.Spec.NodeName设为节点名、将pod状态改为已调度。
kubelet
kubelet核心代码位于cmd/kubelet/app/server.go,入口为startKubelet(),主流程为syncLoopIteration(),其主要从2个channel感知并处理pod变化
- configCh: 该通道事件来自APIServer的同步, 或者直接对kubelet的请求
- plegCh: 来自PLEG的事件,该组件通过对比缓存中的pod状态和container runtime的状态,产生事件。
- syncCh, housekeepingCh: 分别用于定时同步pod、资源清理
// syncLoopIteration reads from various channels and dispatches pods to the
// given handler.
//
// Arguments:
// 1.  configCh:       a channel to read config events from
// 2.  handler:        the SyncHandler to dispatch pods to
// 3.  syncCh:         a channel to read periodic sync events from
// 4.  housekeepingCh: a channel to read housekeeping events from
// 5.  plegCh:         a channel to read PLEG updates from
//
// Events are also read from the kubelet liveness manager's update channel.
//
// The workflow is to read from one of the channels, handle that event, and
// update the timestamp in the sync loop monitor.
//
// Here is an appropriate place to note that despite the syntactical
// similarity to the switch statement, the case statements in a select are
// evaluated in a pseudorandom order if there are multiple channels ready to
// read from when the select is evaluated.  In other words, case statements
// are evaluated in random order, and you can not assume that the case
// statements evaluate in order if multiple channels have events.
//
// With that in mind, in truly no particular order, the different channels
// are handled as follows:
//
// * configCh: dispatch the pods for the config change to the appropriate
//             handler callback for the event type
// * plegCh: update the runtime cache; sync pod
// * syncCh: sync all pods waiting for sync
// * housekeepingCh: trigger cleanup of pods
// * liveness manager: sync pods that have failed or in which one or more
//                     containers have failed liveness checks
func (kl *Kubelet) syncLoopIteration(configCh <-chan kubetypes.PodUpdate, handler SyncHandler,
	syncCh <-chan time.Time, housekeepingCh <-chan time.Time, plegCh <-chan *pleg.PodLifecycleEvent) bool {
在syncLoopIteration(),kubelet不断从channel中获取事件并交由相应的handler处理。以新增pod为例,pod先经过 在HandlePodAdditions()、dispatchWork()、UpdatePod()、managePodLoop()、中进行一些前置操作后,进入核心流程syncPod()。
// syncPod is the transaction script for the sync of a single pod.
//
// Arguments:
//
// o - the SyncPodOptions for this invocation
//
// The workflow is:
// * If the pod is being created, record pod worker start latency
// * Call generateAPIPodStatus to prepare an v1.PodStatus for the pod
// * If the pod is being seen as running for the first time, record pod
//   start latency
// * Update the status of the pod in the status manager
// * Kill the pod if it should not be running
// * Create a mirror pod if the pod is a static pod, and does not
//   already have a mirror pod
// * Create the data directories for the pod if they do not exist
// * Wait for volumes to attach/mount
// * Fetch the pull secrets for the pod
// * Call the container runtime's SyncPod callback
// * Update the traffic shaping for the pod's ingress and egress limits
//
// If any step of this workflow errors, the error is returned, and is repeated
// on the next syncPod call.
//
// This operation writes all events that are dispatched in order to provide
// the most accurate information possible about an error situation to aid debugging.
// Callers should not throw an event if this operation returns an error.
func (kl *Kubelet) syncPod(o syncPodOptions) error {
对于新增的pod,syncPod()中会为其更新状态、创建cgroup、attach/Mount volume、获取secrets,最终调用pkg/kubelet/kuberuntime/kuberuntime_manager.go的SyncPod()方法,进行sandbox、容器的删除、创建。sandbox是CRI (容器运行时)的一个概念,指一个资源隔离的环境,对于k8s而言,即是一个pod。对于docker运行时,sandbox中会有一个pause容器作为其他容器的parent,以使得pod内的各个容器共享网络、进程等namespace。
// SyncPod syncs the running pod into the desired pod by executing following steps:
//
//  1. Compute sandbox and container changes.
//  2. Kill pod sandbox if necessary.
//  3. Kill any containers that should not be running.
//  4. Create sandbox if necessary.
//  5. Create ephemeral containers.
//  6. Create init containers.
//  7. Create normal containers.
func (m *kubeGenericRuntimeManager) SyncPod(pod *v1.Pod, podStatus *kubecontainer.PodStatus, pullSecrets []v1.Secret, backOff *flowcontrol.Backoff) (result kubecontainer.PodSyncResult) {
  // implementation detail ignored
}
应用间通信
应用间通信,其实就是容器间通信。对于同一个pod内的容器,共享网络空间,可以直接通信;对于其他容器,
K8s的网络模型里,所有pod都处在一个扁平化的网络地址空间中,网络实现需要满足以下3个要求
所有容器间的通信无需经过NAT
集群节点与容器,容器与节点的通信无需经过NAT
容器本身看到的ip地址与其他容器看到的ip地址一样
其网络实现由各种CNI(容器网络插件)实现,cni可分为以下几类
L2方案
二层网络方案实现简单,适用于小型集群,节点和pod属于同一个子网,通过ARP进行地址发现。
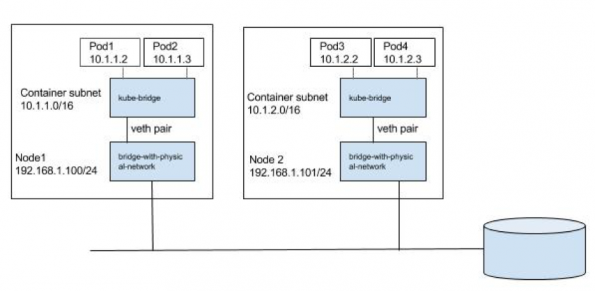
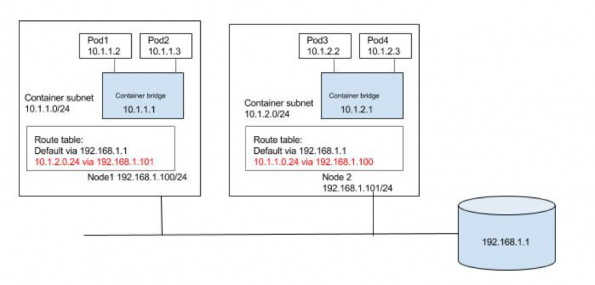
L3方案
三层网络方案更具伸缩性,能支持更多节点。通过修改路由表,让目标地址为10.1.1.0/24和10.1.2.0/24包分别经过node1和node2.
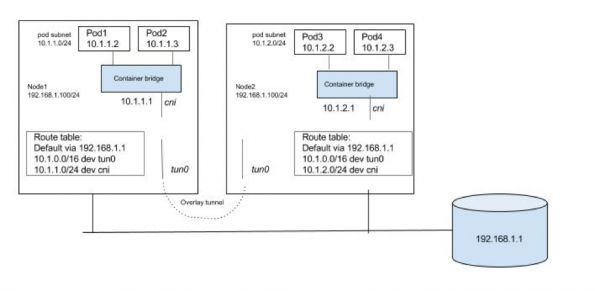
overlay方案
overlay方案将pod间的流量,在源节点封包,通过一些路由规则重定向到指定的隧道(VXLAN, GRE)、通过隧道发送到目标节点,再拆包后继续流转,来实现一个虚拟的、扁平的网络结构。只要节点间相互可达,则集群中的pod就处于一个互相可见的扁平网络中。
应用服务露出
一般通过创建Service露出应用服务,每个service有一个固定的集群ip,后端对应多个endpoint,每个endpoint对应一个能提供服务的后端pod。
集群内
kube-proxy使用etcd的watch机制,监控集群中service和endpoint对象数据的动态变化,维护service和endpoint的映射关系,并进行iptables的维护。集群内,通过设置路由规则,将对service的访问,重定向到后端的pod上。
集群外
一般通过ingress将集群外的请求路由到集群内的服务。ingress可以为service提供外部访问的url、负载均衡、ssl终止等能力。配置ingress包括两部分,一是ingress controller: 监听ingress资源并使之生效,以nginx ingress controller为例,监听ingress资源创建、并动态修改nginx配置。ingress配置如下
apiVersion: networking.k8s.io/v1
kind: Ingress
metadata:
  name: minimal-ingress
  annotations:
    nginx.ingress.kubernetes.io/rewrite-target: /
spec:
  rules:
  - http:
      paths:
      - path: /foo
        pathType: Prefix
        backend:
          service:
            name: foo
            port:
              number: 80
      - path: /bar
        pathType: Prefix
        backend:
          service:
            name: bar
            port:
              number: 80
删除pod
当执行kubectl delete pod podName, APIServer收到删除pod的请求后,更新pod metadata,将.metadata.deletionTimestamp设为当前时间。kubelete监听到该变化,调用容器运行时接口删除容器、释放资源。删除完成后,kubelete想APIServer发起强制删除请求,从etcd中删除pod。
// One of the following arguments must be non-nil: runningPod, status.
func (kl *Kubelet) killPod(pod *v1.Pod, runningPod *kubecontainer.Pod, status *kubecontainer.PodStatus, gracePeriodOverride *int64) error {
	var p kubecontainer.Pod
	if runningPod != nil {
		p = *runningPod
	} else if status != nil {
		p = kubecontainer.ConvertPodStatusToRunningPod(kl.getRuntime().Type(), status)
	} else {
		return fmt.Errorf("one of the two arguments must be non-nil: runningPod, status")
	}

	// Call the container runtime KillPod method which stops all running containers of the pod
	if err := kl.containerRuntime.KillPod(pod, p, gracePeriodOverride); err != nil {
		return err
	}
	if err := kl.containerManager.UpdateQOSCgroups(); err != nil {
		klog.V(2).Infof("Failed to update QoS cgroups while killing pod: %v", err)
	}
	return nil
}
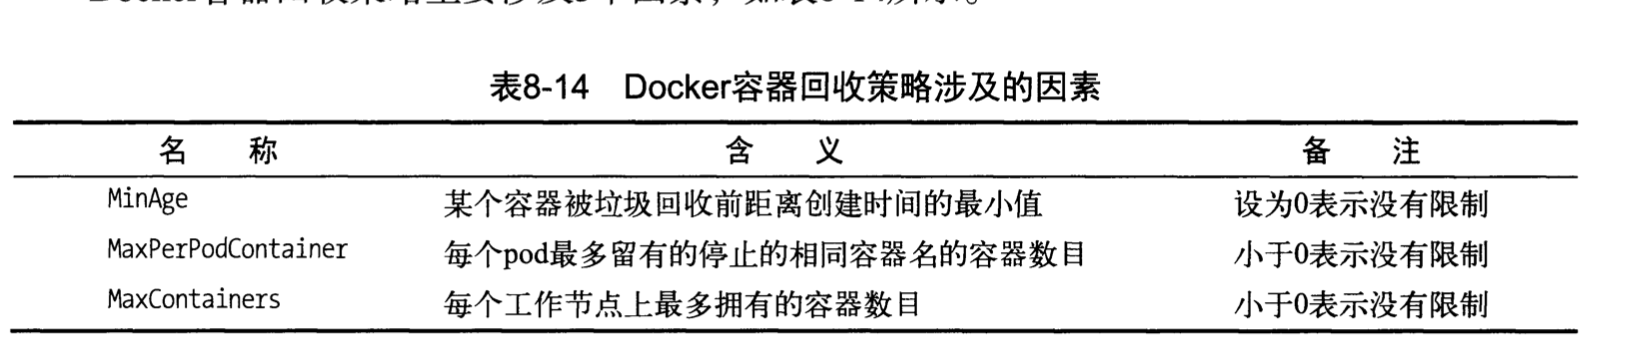
对于docker而言,kl.containerRuntime.KillPod只是docker stop而非docker rm。这些资源在k8s垃圾回收时会被删除。k8s的垃圾回收机制包括两方面:
docker容器来及回收
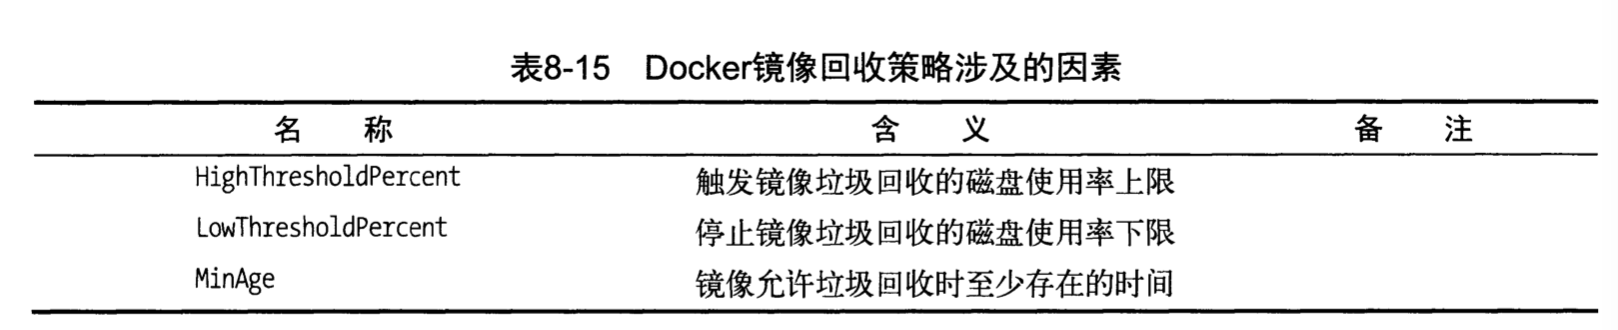
镜像垃圾回收
但实际场景中,往往更加复杂,设计多个应用,且具有一定的依赖关系,如下图所示。此时如何向k8s描述应用A, B, C间的依赖关系;如何维护各个应用的多个资源文件(如service, ConfigMap, Secret),(定义在一个yaml文件中显然不合理);同一个应用的资源文件往往有大量相同的字段值(metadata, label),每次迭代也只更新部分字段,如何集中管理这些字段值,避免冗余和不一致?
在实际生产中,一般使用chart来描述应用,一个典型的chart结构如下所示,关键资源如下
- Chart.yaml: 声明chart 名称、版本,helm api版本定义,依赖的charts
- charts/: 依赖的charts,
helm dependency update会根据Chart.yaml,将依赖charts下载到该目录 - templates/: 所有需要创建的资源模板,其中各个资源公共的字段值,需要变更的字段值往往使用占位符表示
- values.yaml: 集中声明各个占位符的实际值
├── Chart.yaml
├── README.md
├── charts
│   └── mariadb
│       ├── Chart.yaml
│       ├── README.md
│       ├── templates
│       │   ├── NOTES.txt
│       │   ├── _helpers.tpl
│       │   ├── configmap.yaml
│       │   ├── deployment.yaml
│       │   ├── pvc.yaml
│       │   ├── secrets.yaml
│       │   ├── svc.yaml
│       │   ├── test-runner.yaml
│       │   └── tests.yaml
│       └── values.yaml
├── templates
│   ├── NOTES.txt
│   ├── _helpers.tpl
│   ├── deployment.yaml
│   ├── externaldb-secrets.yaml
│   ├── ingress.yaml
│   ├── pvc.yaml
│   ├── secrets.yaml
│   ├── svc.yaml
│   ├── tests
│   │   └── test-mariadb-connection.yaml
│   └── tls-secrets.yaml
└── values.yaml
完成chart定义后,可以使用helm部署应用, helm install app_chart。helm的工作非常简单,使用values.yaml渲染chart中的模板,再调动k8s api进行资源创建。细节上,每次”使用chart创建应用”被称为一次release,每个release创建的资源包括包括chart本身以及其依赖的chart(位于charts/目录中)。但对于复杂的依赖场景,建议将每个应用单独部署,使用argo之类的编排工具根据依赖关系编排部署流程。helm架构如下图所示,最新的helm 3使用简单的客户端架构、移除了服务端tiller模块 (helm 2中单独有一个tiller模块负责与k8s api交互,部署在k8s集群里)。关于helm的更多内容,详见Helm Quickstart Guide 。 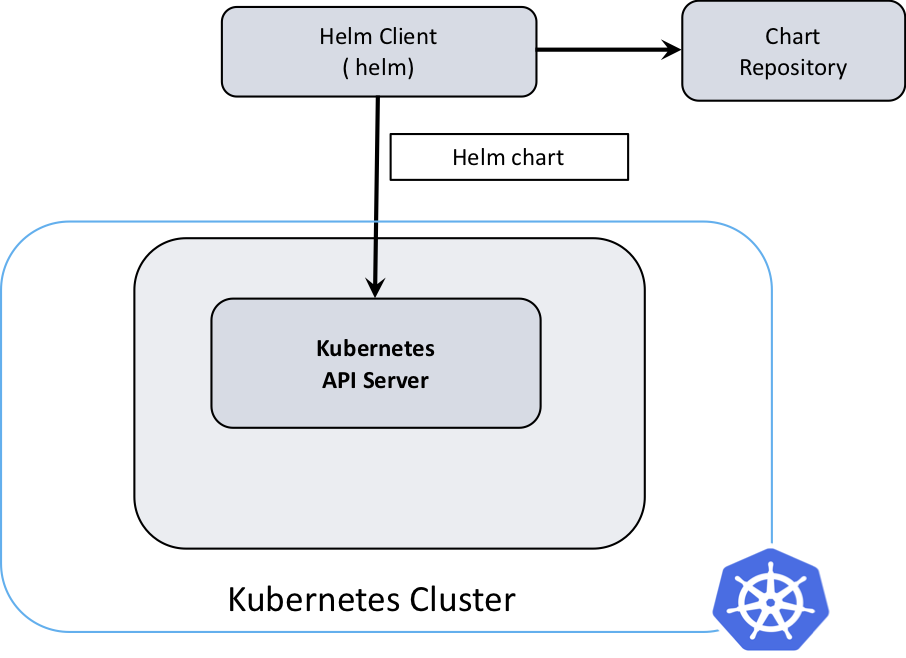
文档信息
- 本文作者:Xiaodao Cui
- 本文链接:https://cuixiaodao.github.io/2021/09/14/k8s-applications/
- 版权声明:自由转载-非商用-非衍生-保持署名(创意共享3.0许可证)